Introduction
Wanaku aims to provide unified access, routing and resource management capabilities for your organization and your AI Agents.
Understanding What Is Wanaku
The Wanaku MCP Router is an integration service designed to securely connect AI agents with various enterprise systems and cloud services. It acts as a central hub that manages and governs how agents access specific resources and tools, effectively proxying and filtering capabilities exposed to Large Language Models (LLMs).
The Wanaku MCP Router itself does not directly host tools or resources; instead, it acts as an integration service that connects AI agents with external resources and tools, including enterprise systems and cloud services. It manages and governs access between agent types and specific resources, proxying and filtering available capabilities to agents and their LLM
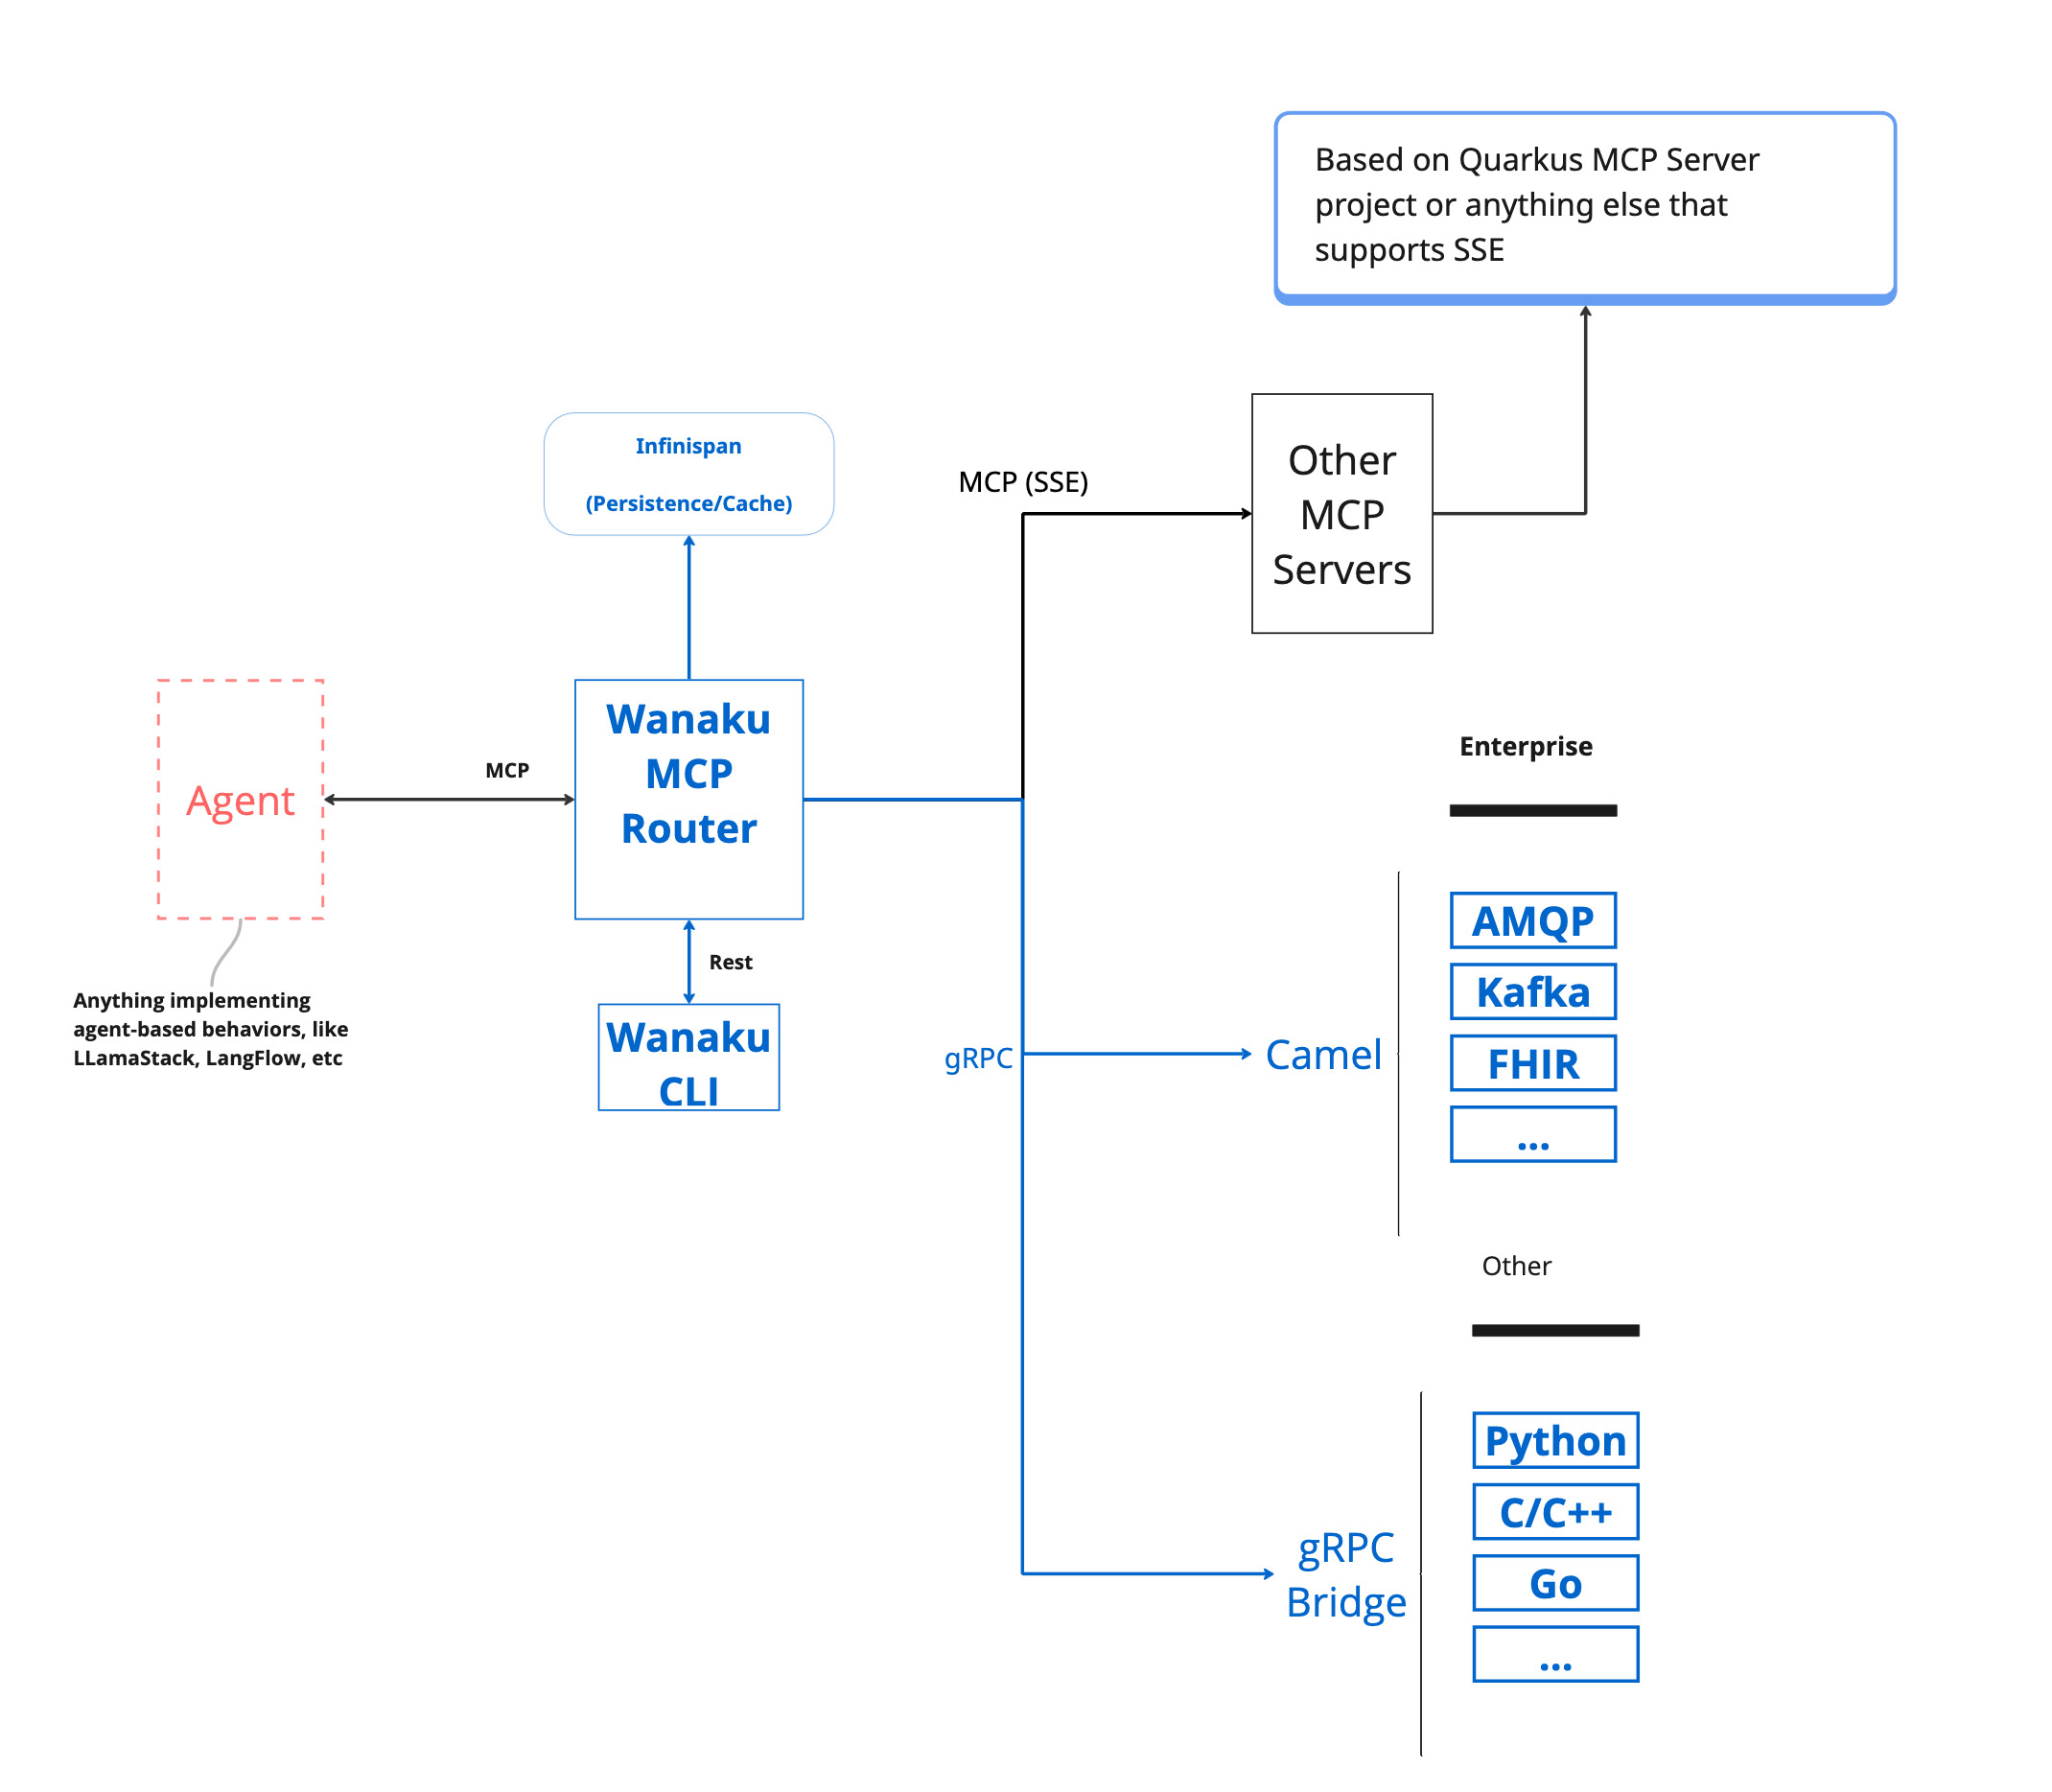
Wanaku provides specialized services, referred to as "capabilities" that offer specific functionalities to the Wanaku MCP Router.
These capabilities enable communication with various systems, such as Kafka services, message brokers, cloud services (AWS, Azure, Google, etc.), databases and a wide range of enterprise systems, including Workday and Salesforce, without directly containing the tools or resources.
Furthermore, Wanaku features an MCP-to-MCP bridge, which allows it to act as a centralized gateway or proxy for other MCP servers that use HTTP as the transport mechanism. This capability enables Wanaku to aggregate and effectively "hide" multiple external MCP servers, simplifying management and increasing the overall functionality of a Wanaku instance. Wanaku is an open-source project and is licensed under Apache 2.0.
Meet Wanaku
If you haven't seen it already, we recommend watching the Getting Started with Wanaku video that introduces the project, and introduces how it works.

NOTE
Also check the Getting Started from the demos repository.
Using Wanaku
Using Wanaku MCP Router involves three key actions:
- Adding tools or resources to the MCP router
- Forwarding other MCP servers via the MCP forwarder
- Adding new capabilities via downstream services
Adding tools or resources that use those capabilities
Adding tools and resources to the Wanaku MCP Router expands the functionality available to agents using Wanaku.
- MCP tools equip an agent with capabilities not inherently present in its native models.
- MCP resources, on the other hand, allow an AI agent to consume data—such as files or records—and inject additional information into its context.
Both tools and resources depend on capabilities that can be dynamically added to or removed from the Wanaku MCP Router. Once these capabilities are integrated, either through downstream services or by connecting to other MCP servers, users can then incorporate new tools and resources into Wanaku. These additions can then leverage the newly integrated capabilities to interact with enterprise systems and cloud services.
Forwarding other MCP servers via the MCP forwarder
Wanaku can act as a central gateway or proxy to other MCP servers that use HTTP as the transport mechanism. This feature allows for a centralized endpoint to aggregate tools and resources provided by other MCP servers, making them accessible as if they were local to the Wanaku instance.
Adding new capabilities via downstream services
This refers to extending the router's functionality by integrating with various external systems.
Wanaku leverages Quarkus and Apache Camel to provide connectivity to a vast range of services and platforms. This allows users to create custom services to solve particular needs. These services can be implemented in any language that supports gRPC for communication with the Wanaku MCP Router.
NOTE
It is also possible to create and run services in Java and other languages, such as Go or Python, although the process is not entirely documented at the moment.
Installing Wanaku
To run Wanaku, you need to first download and install the router and the command line client.
Installing the CLI
Although the router comes with a UI, the CLI is the primary method used to manage the router. As such, it's recommended to have it installed.
Installing the CLI by downloading binary
The most recommended method for installing the Wanaku CLI is to download the latest version directly from the release page on GitHub
Installing the CLI via JBang
To simplify using the Wanaku Command Line Interface (CLI), you can install it via JBang.
First, ensure JBang is installed on your system. You can find detailed download and installation instructions on the official JBang website.
After installing JBang, verify it's working correctly by opening your command shell and running:
jbang versionThis command should display the installed version of JBang.
Next, to access the Wanaku CLI, install it using JBang with the following command:
jbang app install wanaku@wanaku-ai/wanakuThis will install Wanaku CLI as the wanaku command within JBang, meaning that you can run Wanaku from the command line by just executing wanaku.
NOTE
It requires access to the internet, in case of using a proxy, please ensure that the proxy is configured for your system. If Wanaku JBang is not working with your current configuration, please look to Proxy configuration in JBang documentation.
Installing and Running the Router
There are three ways to run the router. They work similarly, with the distinction that some of them may come with more capabilities by default — continue reading the documentation below for details.
Installing and Running Wanaku Locally Using "Wanaku Start Local"
After downloading the CLI, simply run wanaku start local and the CLI should download, deploy and start Wanaku with the main server, a file provider and an HTTP provider.
If that is successful, open your browser at http://localhost:8080, and you should have access to the UI.
NOTE
You can use the command line to enable more services by using the --services option. Use the --help to see the details.
Installing and Running Wanaku Using Docker Compose
To run Wanaku using containers, you can download docker-compose.yml file and use it to launch Wanaku. The commands below walk through the steps:
Download the file:
wget https://raw.githubusercontent.com/wanaku-ai/wanaku/refs/heads/main/docker-compose.ymlThen, you can launch the containers using:
docker-compose up -dAlternatively, using podman:
podman compose up -dOpen Wanaku Console to easily import toolsets, add new tools, resources, and test tools using simple LLMChat:
Open your browser at http://localhost:8080, and you should have access to the UI if Wanaku was launched successfully.
Installing and Running Wanaku on OpenShift or Kubernetes
It is also possible to run Wanaku on Kubernetes distributions, such as OpenShift. This is not documented at this moment, but you can look at our deployment files for details.
When running Wanaku locally, such as via wanaku start local or via the Docker compose file, the capabilities should discover the address of the Wanaku MCP router automatically. However, that doesn't happen automatically on the cloud. You must set the address of the router using settings such as wanaku.service.registration.uri or the environment variable WANAKU_SERVICE_REGISTRATION_URI to point to the actual location of the router.
[IMPORTANT] This can also be required when running the router and the services on different hosts.
Installing the Command Line Interface (CLI)
In addition to installing the Wanaku MCP Router, it is also necessary to install the CLI used to manage the router. The Wanaku MCP Router CLI provides a simple way to manage resources and tools for your Wanaku MCP Router instance.
NOTE
Wanaku also comes with a web user interface that you can access on port 8080 of the host running the router, but at this moment, some features are only available on the CLI.
The MCP endpoint exposed by Wanaku can be accessed on the path /mcp/sse of the host you are using (for instance, if running locally, that would mean http://localhost:8080/mcp/sse)
Using the Wanaku MCP Router
Understanding Capabilities
Wanaku itself does not have any builtin MCP tool, resource or functionality itself. The router itself is just a blank MCP server.
To actually perform its work, Wanaku relies on specialized services that offer the connectivity bridge that enables Wanaku to talk to any kind of service. At its core, Wanaku is powered by Quarkus and Apache Camel, which provide the ability to connect to more than 300 different types of systems and services.
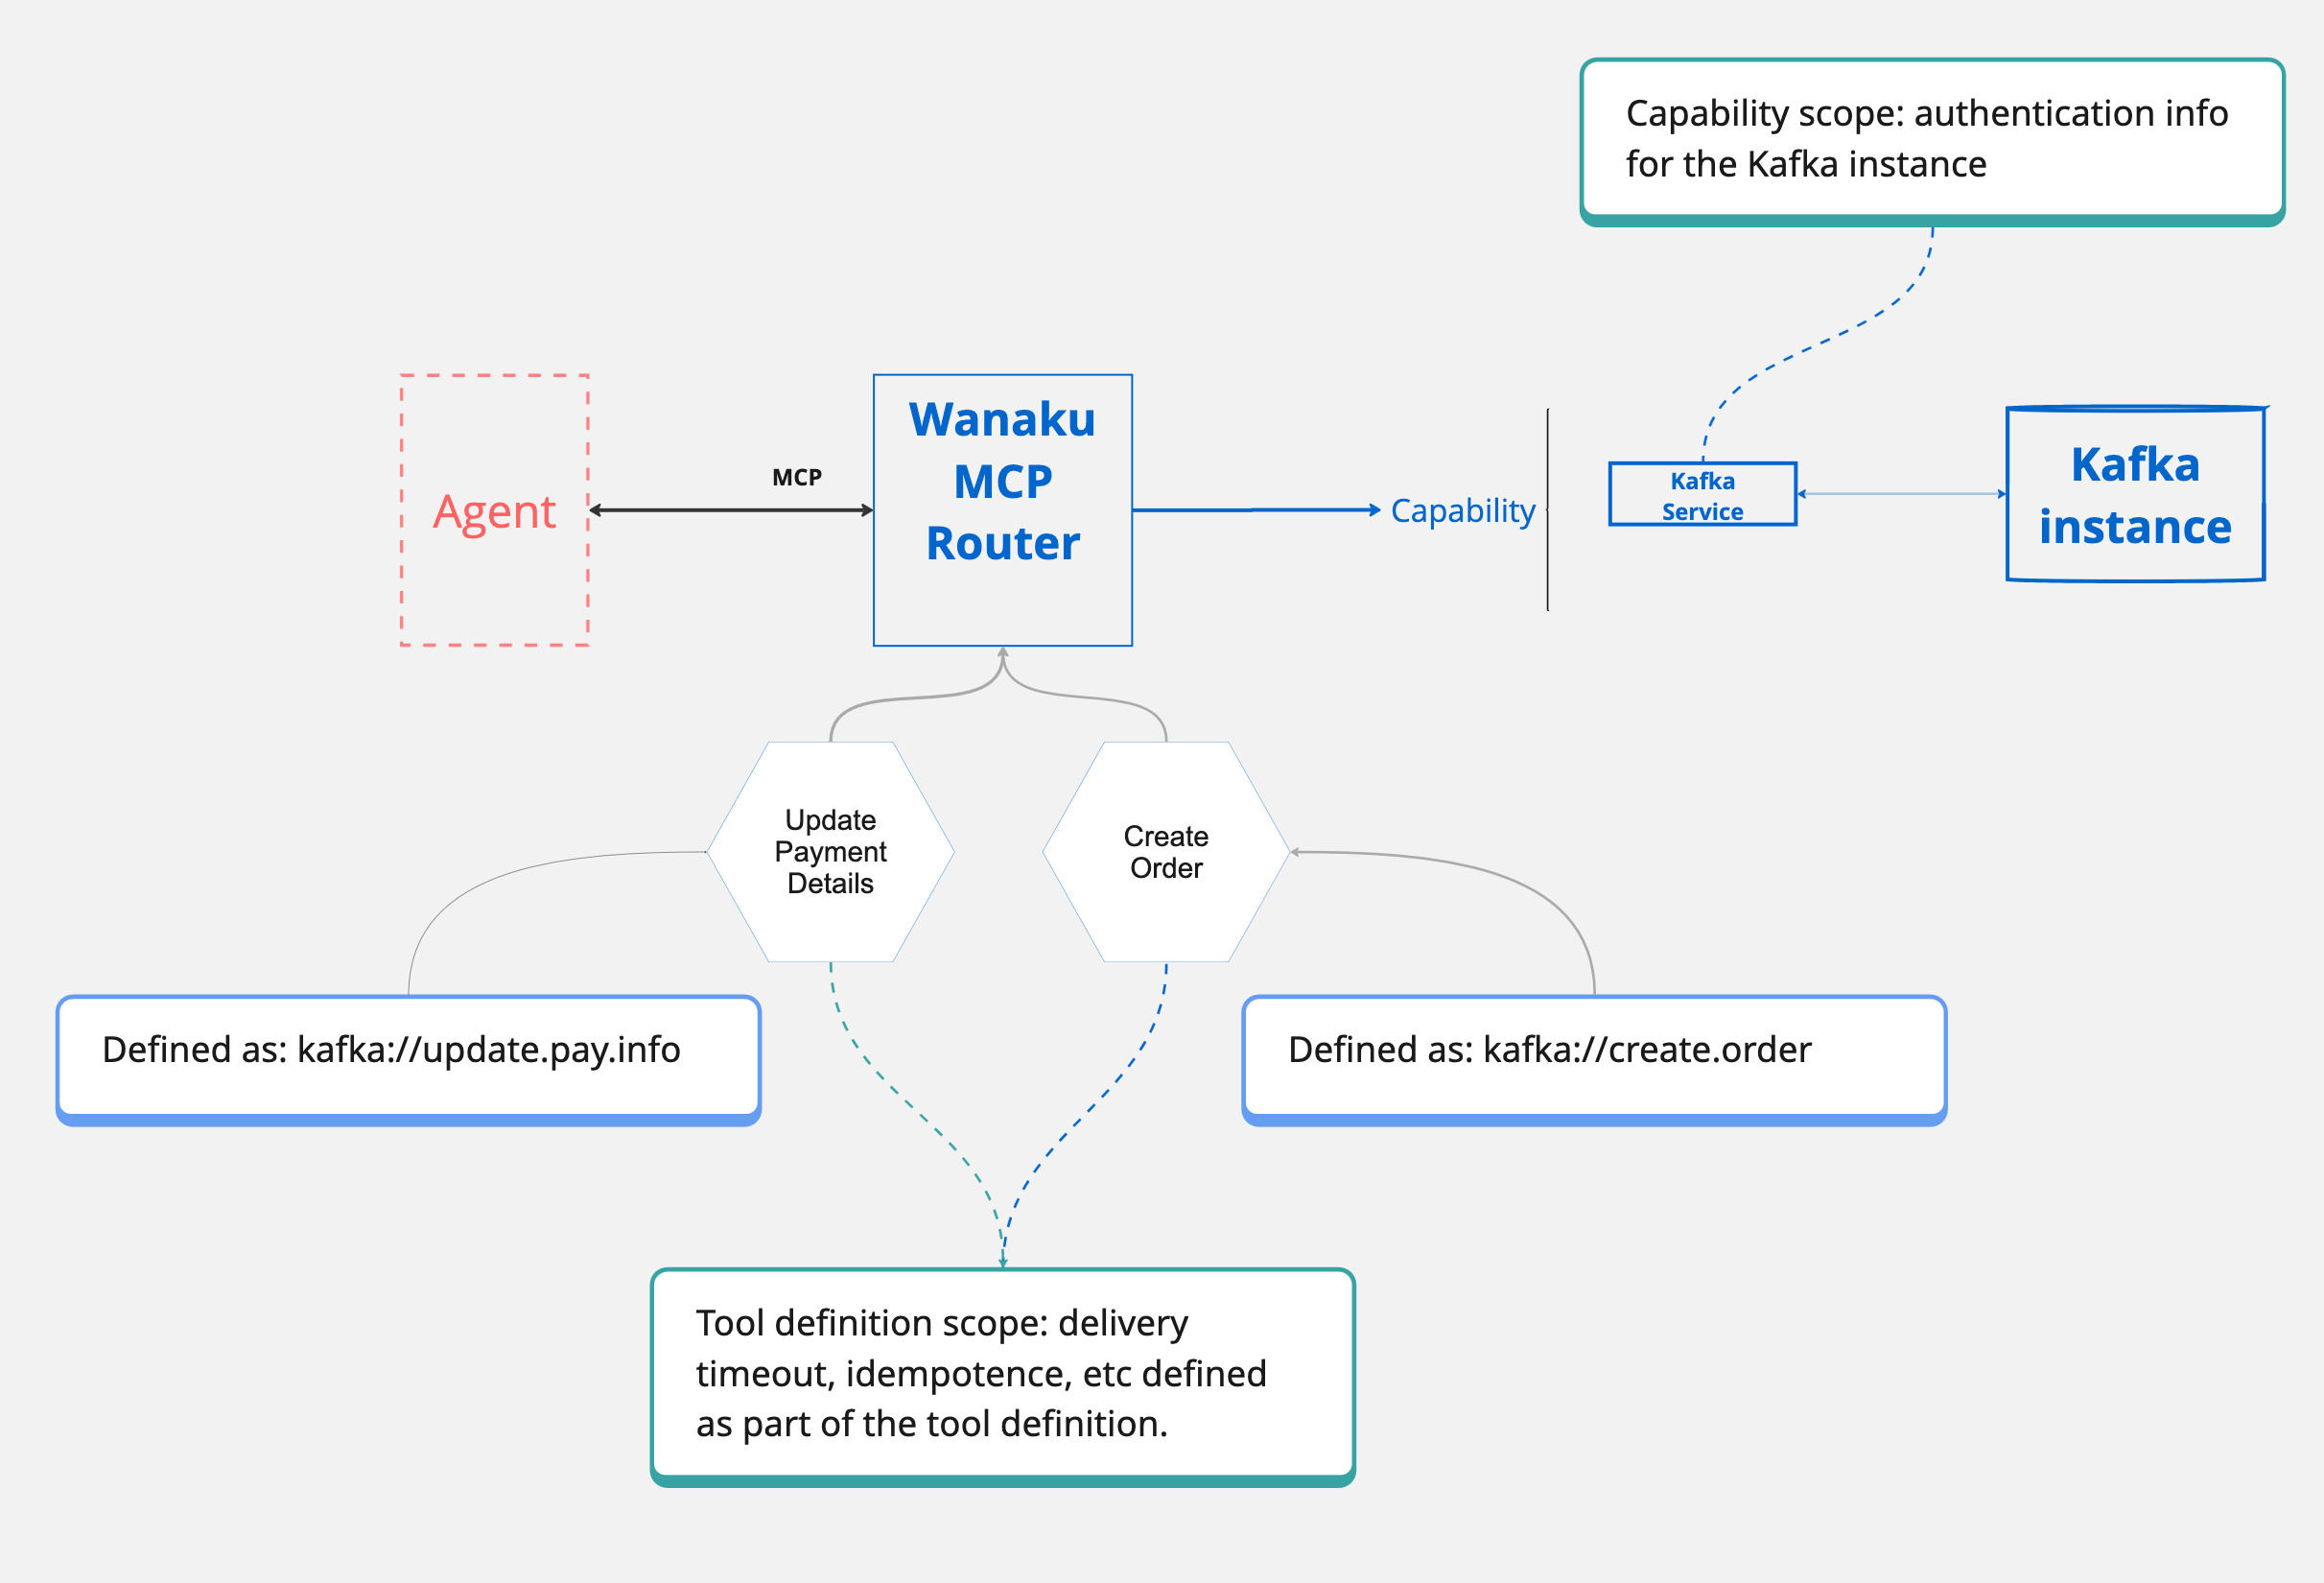
For instance, by adding a "Kafka" capability to Wanaku, it allows it to talk to any kind of Kafka service.
NOTE
Capabilities were, at some point, also called "Downstream services" or "targets". You may still see that terminology used in some places, specially in older documentation.
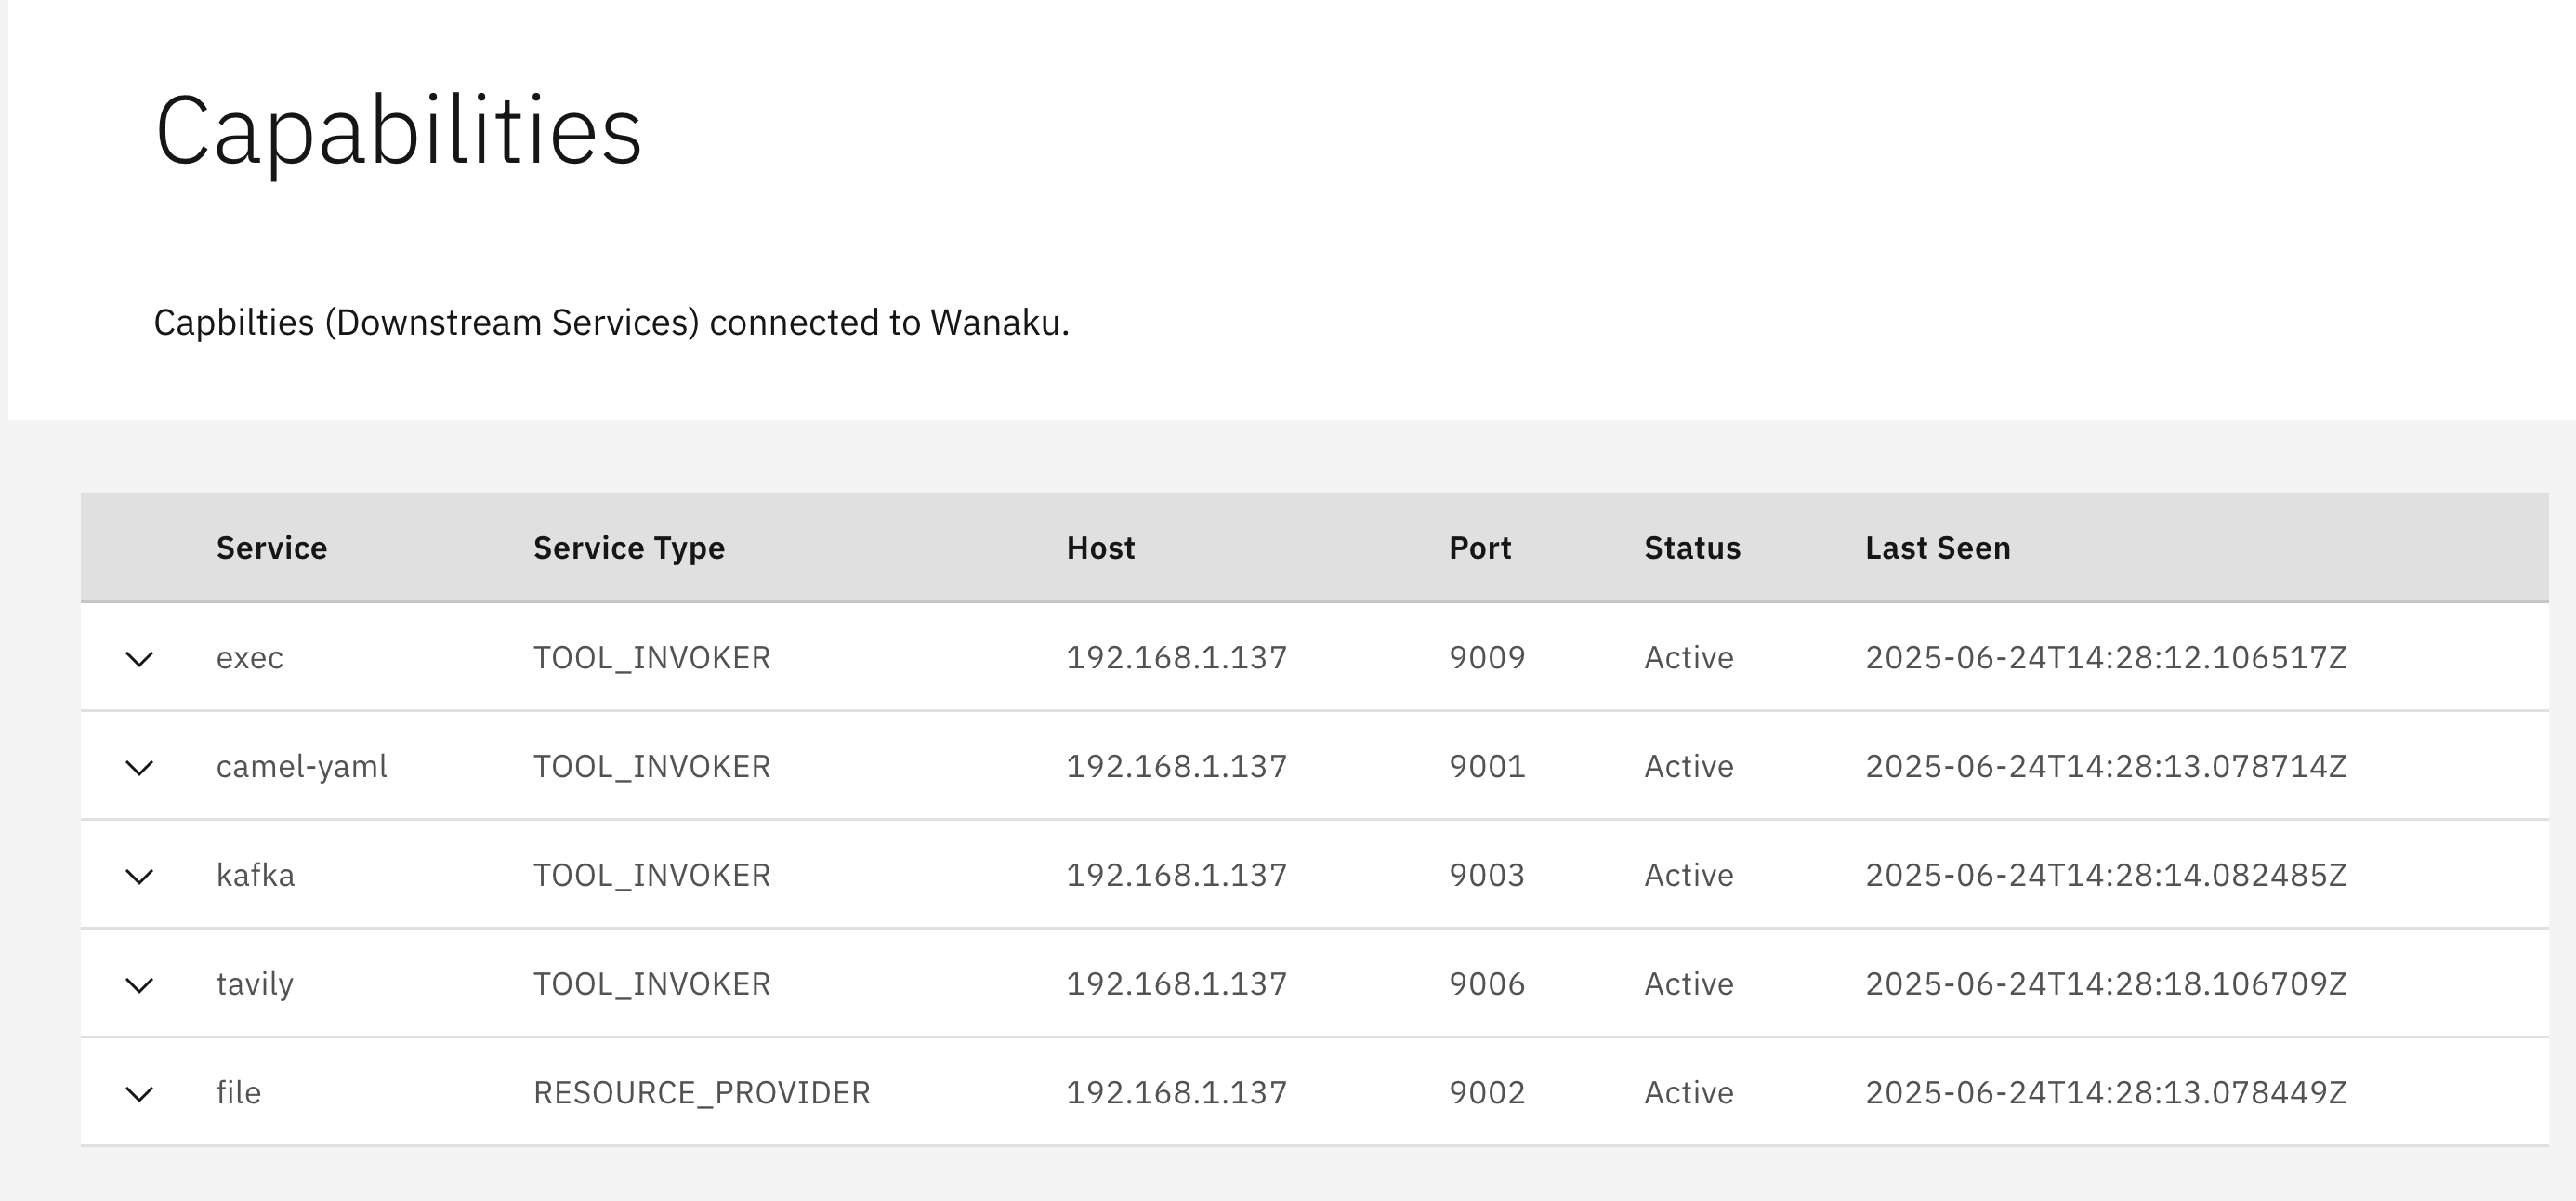
You should see a list of capabilities available in the UI, in the Capabilities page. Something similar to this:
On the CLI, running wanaku targets tools list lists the capabilities available for MCP tools:
ID                                       SERVICE                 HOST
bee5f297-4f7a-4d1c-b0c6-0ac372fcae2c  => exec                 => 192.168.1.137
92380df9-bcd3-43cb-a4c2-eabe7b06b415  => tavily               => 192.168.1.137
2b70d26b-6d87-4931-8415-684c0d8ca45e  => camel-yaml           => 192.168.1.137
dcf9acdf-1bee-42db-b440-b64caf77a469  => kafka                => 192.168.1.137
And the command wanaku targets resources list, lists the capabilities available for MCP resources:
ID                                       SERVICE                 HOST
60a96f6c-8f71-48e8-a2bf-1872b6869d77  => file                 => 192.168.1.137
Capabilities determine what type of tools you may add to the router. As such, in the output from the CLI above, it means that this server can add tools of the following types: exec, tavily, camel-yaml and kafka. The same applies to MCP resources: the Wanaku MCP instance above can handle MCP resources of the type file.
Managing MCP Tools
An MCP (Model Context Protocol) tool enables Large Language Models (LLMs) to execute tasks beyond their inherent capabilities by using external functions. Each tool is uniquely identified by a name and defined with an input schema that outlines the expected parameters. Essentially, MCP tools act as a standardized interface through which an AI agent can request information or execute specific tasks from external systems, like APIs or databases.
When adding a tool to Wanaku, there are two key considerations:
- Capability: determine which capability will handle the request and process the input data.
- Tool/Service Arguments: Identify any arguments (also known as properties) that the tool and/or service accept.
A capability service is required to be available at the moment when a new tool is being added to Wanaku MCP Router.
Adding Tools Using the CLI
To add a new tool to a Wanaku MCP Router instance running locally on http://localhost:8080, use the following command:
wanaku tools add -n "meow-facts" --description "Retrieve random facts about cats" --uri "https://meowfacts.herokuapp.com?count={parameter.valueOrElse('count', 1)}" --type http --property "count:int,The count of facts to retrieve" --required countThe command wanaku tools add is used to register a new tool with the Wanaku MCP Router. Let's break down each part of the command:
-n "meow-facts": This flag sets the name of the tool to "meow-facts". This is a unique, human-readable identifier for the tool.--description "Retrieve random facts about cats": This provides a description of what the tool does, making it clear for users and LLMs.--uri "https://meowfacts.herokuapp.com?count={parameter.valueOrElse('count', 1)}": This specifies the URI (Uniform Resource Identifier) that the tool will interact with. In this case, it's an HTTP endpoint that provides cat facts. The {parameter.valueOrElse('count', 1)} part indicates that the count parameter from the tool's input will be used in the URI. If count is not provided, it will default to 1. This demonstrates how Wanaku can dynamically build URIs with parameters.--type http: This defines the type of the tool's underlying service, which in this case ishttp. This tells Wanaku that it should use its HTTP service handling capabilities for this tool.--property "count:int,The count of facts to retrieve": This defines an input property for the tool named count. It specifies that count is an integer (int) and provides a description of what it represents:"The count of facts to retrieve".--required count: This flag indicates that the count property is a required input for this tool.
NOTE
For remote instances, you can use the parameter --host to point to the location of the instance.
[IMPORTANT] The meaning of the
uriand how to actually compose it, depends on the type of capability being used. Each capability describes exactly the meaning of the URI, so make sure to check the capability service for details. Additionally, this is covered in more details in the Creating URIs section below.
Configuring the Capabilities
Sometimes, specific configurations are required for the downstream services (capabilities) that a tool uses. This might include setting timeouts for operations or providing credentials to access a particular resource.
In such scenarios, you can associate configuration and secret files directly with a tool. These files will be automatically used by the underlying capabilities each time the tool is invoked.
Here's an example of how to add a tool and link it to configuration and secret files:
wanaku tools add --host http://localhost:8080 -n "meow-facts" --description "Retrieve random facts about cats" --uri "https://meowfacts.herokuapp.com?count={count or 1}" --type http --property "count:int,The count of facts to retrieve" --required count --configuration-from-file capabilities.properties --secrets-from-file secret.propertiesIn this command:
--configuration-from-file capabilities.properties: This flag specifies a file namedcapabilities.propertiesthat contains configuration settings to be passed to the underlying capability whenever the"meow-facts"tool is used.--secrets-from-file secret.properties: This flag points to a file namedsecret.propertiesthat holds sensitive information (like API keys or passwords) needed by the capability to access resources, ensuring secure handling of credentials.
Some capabilities within Wanaku are designed to interpret these configuration settings to dynamically adjust how they interact with external systems. For instance, Camel-based capabilities leverage these settings, particularly those prefixed with query., to modify the Camel URI used for the endpoint.
Consider the following example in a configuration file:
key=value
query.addKey=addedValue
In this scenario, a Camel-based capability would automatically append addKey=addValue to the URI passed to the underlying Camel producer. This allows for flexible and dynamic adjustment of endpoint parameters based on the provided configuration.
Secrets behave just as similarly, but are adapted by the capabilities for secure handling of the data.
Adding Tools Using the UI
It is also possible to add new tools using the UI, by accessing the Tools page and filling the form.
Importing a ToolSet
Wanaku ToolSets are collections of tools that can be easily shared and imported into your Wanaku router. This feature allows for convenient distribution of pre-configured tools among users.
Wanaku provides a selection of ready-to-use ToolSets that you can import to quickly get started and explore its functionalities.
To import a ToolSet directly into your router from a URL, use the following command:
wanaku tools import https://raw.githubusercontent.com/wanaku-ai/wanaku-toolsets/refs/heads/main/toolsets/currency.jsonIf you have a ToolSet definition file already stored on your local machine, you can import it using its file path:
wanaku tools import /path/to/the/toolsets/currency.jsonViewing Tools
You can check what tools are available in a Wanaku MCP Router instance by running:
wanaku tools listEditing Tools
The wanaku tools edit command enables you to modify the existing definition of a tool that is registered with your Wanaku MCP Router. This command provides a convenient way to update a tool's JSON definition directly within your terminal using the nano text editor.
wanaku tools edit [options] [toolName]In this command:
toolName: (Optional) Specifies the exact name of the tool you wish to modify. If this argument is omitted, the command will present you with an interactive, scrollable list of all currently registered tools, allowing for easy selection.
If you know the precise name of the tool you want to edit, you can specify it directly.
For example, to edit a tool named "my-custom-tool":
wanaku tools edit my-custom-toolUpon executing this command, Wanaku will fetch the JSON definition of "my-custom-tool" and open it in the nano editor within your terminal. After making your desired changes, save them (usually by pressing Ctrl+S) and then exit nano (Ctrl+X). Wanaku will then ask for your confirmation before applying the updates to the tool's definition.
When you're unsure of the exact tool name or want to browse available tools, run the edit command without specifying a toolName:
wanaku tools editThis will present an interactive, scrollable list of all your registered tools.
Use your keyboard's arrow keys to navigate and highlight the tool you wish to edit, then press Enter.
The selected tool's JSON definition will then open in nano for you to make your modifications.
Listing Tools
Any available tool is listed by default when you access the UI.
When using the CLI, the wanaku tools list command allows you to view all available tools on your Wanaku MCP Router instance.
Running this command will display a comprehensive list of tools, including their names and descriptions.
wanaku tools listFor example, you should receive an output similar to this.
Name               Type               URI
meow-facts      => http            => https://meowfacts.herokuapp.com?count={parameter.valueOrElse('count', 1)}
dog-facts       => http            => https://dogapi.dog/api/v2/facts?limit={parameter.valueOrElse('count', 1)}
Removing Tools
Tools can be removed from the UI, by clicking on the Trash icon, or on the CLI by running the command wanaku tools remove --name [name].
For instance:
wanaku tools remove --name "meow-facts"
Generating Tools
The wanaku tools generate command converts an OpenAPI specification into a collection of tool references that can be used by an AI agent.
It parses and resolves OpenAPI paths and operations, transforming them into a standardized tool reference format for HTTP services.
This command accepts an OpenAPI specification file (either as a local path or URL) and produces a JSON output containing tool references.
Each operation in the API is converted to a tool reference with appropriate metadata, including the operation's name, description, URI template, and input schema.
The command handles server variable substitution, proper formatting of path parameters according to the tool reference specification.
By default, the command uses the first server defined in the OpenAPI specification, but you can override this behavior by specifying a different server URL or selecting a different server from the specification by index.
The generated output can be directed to standard output or saved to a file.
If the process completes successfully, the command returns exit code 0. It returns exit code 3 if no paths are found in the specification and exit code 2 if an error occurs during processing.
[NOTE] The command support both
jsonandyamldefinition:
For example:
wanaku tools generate http://petstore3.swagger.io/api/v3/openapi.yamlIf the spec defines a server url that contains variables
servers:
  - url: 'https://{env}.domain.com/foo/{v1}/{v2}/{v3}'
    variables:
      env:
        description: Environment - staging or production
        default: stage-api
        enum:
          - stage-api
          - api
      # other variables
      # ...
Then, you can specify values as command parameters:
wanaku tools generate --server-variable env=prod --server-variable v1=first http://petstore3.swagger.io/api/v3/openapi.jsonIf not specified for a variable in the server URL template, the default value defined in the OpenAPI specification will be used.
It only applies when using servers from the OpenAPI specification (not when using --server-url).
Variables must be defined in the server object of the OpenAPI specification.
Empty or null values for either key or value will be ignored.
OpenAPI specifications can define multiple server URLs:
{
  "servers": [
    {
      "url": "https://api.example.com/v1",
      "description": "Production server"
    },
    {
      "url": "https://staging-api.example.com/v1",
      "description": "Staging server"
    },
    {
      "url": "http://localhost:8080/v1",
      "description": "Local development server"
    }
  ]
}
The --server-index (or -i) option allows you to specify which server definition from the OpenAPI specification should be used as the base URL for tool references.
wanaku tools generate -i 1 ./openapi-spec.yamlThis option is ignored if --server-url is specified, as an explicit URL overrides any server definitions in the specification.
If neither --server-index nor --server-url is specified, the command will default to using the first server (index 0) from the specification.
The --server-index option can be used together with --server-variable when the selected server has variable templates:
servers:
  - url: https://{environment}.api.example.com/{version}
    variables:
      environment:
        default: dev
      version:
        default: v1
  - url: https://{environment}.api2.example.com/{version}
    variables:
      environment:
        default: dev
      version:
        default: v1
  - url: https://{environment}.api3.example.com/{version}
    variables:
      environment:
        default: dev
      version:
        default: v1
You could select this server and override its variables:
wanaku tools generate -i 0 -v environment=prod -v version=v2 ./openapi-spec.yamlThe --output-file (or -o) option specifies the file path where the generated tool references should be written.
It determines where the output JSON containing all the tool references will be saved.
wanaku tools generate -o ./toolsets/api-tools.json http://petstore3.swagger.io/api/v3/openapi.jsonIf --output-file is specified, the command will write the JSON toolset to the specified file path.
If --output-file is not specified, the command will write the JSON toolset to standard output (STDOUT).
If the specified path is a directory, the command will write to a file named out.json within that directory and provide a warning message.
If the specified file already exists, the command will return an error without overwriting the file. The parent directory of the specified file must exist and be writable by the current user.
If the --import (or -I) option is set, the generated toolset is automatically imported into the router, equivalent to running the generate command followed by the import command.
Managing MCP Resources
Exposing Resource
The wanaku resources expose command allows you to make an existing resource available via your Wanaku MCP Router instance.
Just like tools, it also requires a capability that can access the system storing and providing access to the resource (i.e.: FTP, AWS S3, NFS, etc.).
For example, suppose you have a file named test-mcp-2.txt on your home directory on host that has the file capability running, and you want to expose it.
This is how you can do it:
wanaku resources expose --location=$HOME/test-mcp-2.txt --mimeType=text/plain --description="Sample resource added via CLI" --name="test mcp via CLI" --type=fileIn this example:
--location=$HOME/test-mcp-2.txt: Specifies the local path to the resource you want to expose.--mimeType=text/plain: Defines the MIME type of the resource, indicating its content format.--description="Sample resource added via CLI": Provides a descriptive text for the resource.--name="test mcp via CLI": Assigns a human-readable name to the exposed resource.--type=file: Indicates that the exposed resource is a file.
[IMPORTANT] It's important to note that this location refers to a location that the capability (downstream service) is able to access. The exact meaning of "location" depends on the type of the capability. For example:
- For a
filetype, it means the capability needs direct access to the file, implying it's likely running on a host with direct physical access to the file.- For an
ftptype, it means the capability needs access to the FTP server storing the file.Always check the documentation for the capability provider that you are using for additional details about the location specifier.
Listing Resources
The wanaku resources list command allows you to view all resources currently exposed by your Wanaku MCP Router instance.
Executing this command will display a list of available resources, including their names and descriptions.
wanaku resources listManaging Capabilities
Configurations in Wanaku have two distinct scopes:
- Capability service configurations
- Tool definition configurations
Capability Service Configurations
These configurations are essential for setting up the capability provider itself.
This includes details required for the transport mechanism used to access the capability, such as usernames and passwords for authenticating with the undelying system that provides the capability.
Each capability service may have its own specific set of configurations. As such, check the capability service documentation for details.
Tool Definition Configurations
These configurations are specific to individual tools that leverage a particular capability. They include:
- Names and identifiers that differentiate tools using the same capability, like specific Kafka topics or the names of database tables.
- Operational properties that dictate how the tool behaves, such as the type of HTTP method (
GET,POST,PUT), or operational settings like timeout configurations and idempotence flags.
These configurations are handled when adding a new tool to Wanaku MCP Router.
[NOTE] Check the "Configuring the Capabilities" section for additional details about this.
Listing Capabilities
The wanaku capabilities list command provides a comprehensive view of all service capabilities available in the Wanaku Router. It discovers and displays both management tools and resource providers, along with their current operational status and activity information.
The command combines data from multiple API endpoints to present a unified view of the system's capabilities in an easy-to-read table format.
The command displays the results in a table with the following columns:
| Column | Description |
|---|---|
| service | Name of the service |
| serviceType | Type/category of the service |
| host | Hostname or IP address where the service runs |
| port | Port number the service listens on |
| status | Current operational status (active, inactive, or -) |
| lastSeen | Formatted timestamp of last activity |
For instance, running the command, should present you with an output similar to this:
Sample Output

Displaying Service Capability Details
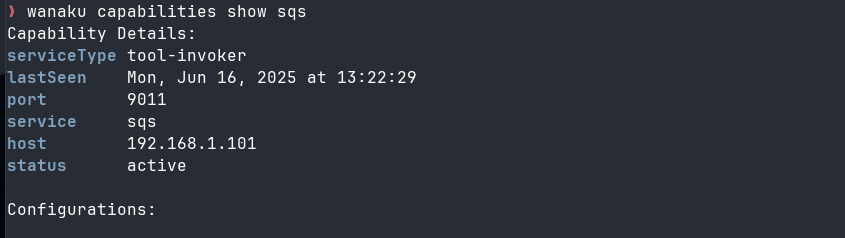
The wanaku capabilities show command lets you view detailed information for a specific service capability within the Wanaku MCP Router.
This includes its configuration parameters, current status, and connection information.
wanaku capabilities show <service> [--host <url>]<service>: The service name to show details for (e.g., http, sqs, file)--host <url>: The API host URL (default: http://localhost:8080)
When you execute the command, Wanaku displays comprehensive details about the chosen service type. If multiple instances of the same service exist, an interactive menu will appear, allowing you to select the specific instance you wish to view.
For example, to show the details for the HTTP service:
wanaku capabilities show httpOr, show details for SQS service linked with to a specific Wanaku MCP router running at http://api.example.com:8080:
wanaku capabilities show sqs --host http://api.example.com:8080The command displays two main sections:
- Capability Summary: Basic service information in table format:
- Service name and type
- Host and port
- Current status
- Last seen timestamp
- Configurations: Detailed configuration parameters:
- Parameter names
- Parameter descriptions
Interactive Selection
When multiple instances of the same service are found, you'll see:
- A warning message indicating multiple matches
- An interactive selection prompt with service details
- Choose your desired instance using arrow keys and Enter

[NOTE] The Wanaku CLI provides clear exit codes to indicate the outcome of a command:
0: The command executed successfully.1: An error occurred (e.g., no capabilities were found, or there were issues connecting to the API).
Listing Targets
You can view linked targets by using either the wanaku targets tools list command (to see targets for tools) or the wanaku target resources list command (to see targets for resources).
For instance, running listing the targets for tools, you should expect a response similar to this:
ID                                       SERVICE                 TARGET
bee5f297-4f7a-4d1c-b0c6-0ac372fcae2c  => exec                 => 192.168.1.137
eaf7a675-2225-40da-965b-d576c1439b92  => kafka                => 192.168.1.137
92380df9-bcd3-43cb-a4c2-eabe7b06b415  => tavily               => 192.168.1.137
2b70d26b-6d87-4931-8415-684c0d8ca45e  => camel-yaml           => 192.168.1.137
[NOTE] The difference between
wanaku targets (tools|resources) listand thewanaku capabilities listis that the listing targets print the ID, which can be helpful when extending Wanaku. For most cases, users should rely on thewanaku capabilities listfeature.
Accessing Other MCP servers (MCP Forwards)
The MCP bridge in Wanaku allows it to act as a central gateway or proxy to other MCP servers that use HTTP as the transport mechanism.
This feature enables a centralized endpoint for aggregating tools and resources provided by other MCP servers.
Listing Forwards
To view a list of currently configured forwards, use the wanaku forwards list command:
wanaku forwards listThis command displays information about each forward, including its name, service URL, and any other relevant details.
This can be useful for managing and troubleshooting MCP server integrations.
Adding Forwards
To add an external MCP server to the Wanaku instance, use the wanaku forwards add command:
wanaku forwards add --service="http://your-mcp-server.com:8080/mcp/sse" --name my-mcp-server--service: The URL of the external MCP server's SSE (Server-Sent Events) endpoint.--name: A unique human-readable name for the forward, used for identification and management purposes.
Once a forward is added, all tools and resources provided by the external MCP server will be mapped in the Wanaku instance.
These tools and resources can then be accessed as if they were local to the server.
Removing Forwards
To remove an external MCP server from the Wanaku instance, use the wanaku forwards remove command:
wanaku forwards remove --service="http://your-mcp-server.com:8080/mcp/sse" --name my-mcp-server--service: The URL of the external MCP server's SSE (Server-Sent Events) endpoint.--name: The human-readable name for the forward to be removed.
Note that attempting to remove a non-existent forward will result in an error message. If you want to remove multiple forwards, simply repeat the command with different names and service URLs.
Example Use Case
Suppose you have two MCP servers: http://mcp-server1.com:8080/mcp/sse and http://mcp-server2.com:8080/mcp/sse.
To integrate these external MCP servers into your Wanaku instance, follow these steps:
- Add the first forward using the
wanaku forwards addcommand:
wanaku forwards add --service="http://mcp-server1.com:8080/mcp/sse" --name mcp-server-1- Use the
wanaku forwards listcommand to confirm that the forward has been successfully added:
wanaku forwards list- Verify that all tools and resources from
mcp-server1are now accessible within your Wanaku instance usingwanaku tools list
Name               Type               URI
tavily-search-local => tavily          => tavily://search?maxResults={parameter.value('maxResults')}
meow-facts      => mcp-remote-tool => <remote>
dog-facts       => mcp-remote-tool => <remote>
camel-rider-quote-generator => mcp-remote-tool => <remote>
tavily-search   => mcp-remote-tool => <remote>
laptop-order => mcp-remote-tool => <remote>- Add the second forward using the same command:
wanaku forwards add --service="http://mcp-server2.com:8080/mcp/sse" --name mcp-server-2- Confirm that tools and resources from both external MCP servers are now integrated into your Wanaku instance (use
wanaku tools list) - Use the
wanaku forwards listcommand to view the updated list of forwards:
wanaku forwards listBy leveraging the MCP bridge feature, you can create a centralized endpoint for aggregating tools and resources from multiple external MCP servers, simplifying management and increasing the overall functionality of your Wanaku instance.
Managing Namespaces
Wanaku introduces the concept of namespaces to help users organize and isolate tools and resources, effectively managing the Large Language Model (LLM) context. This prevents context bloat and improves the efficiency of your Wanaku deployments.
What Are Namespaces
Namespaces provide a mechanism to group related tools and resources.
Each namespace acts as a separate logical container, ensuring that the LLM context for tools within one namespace does not interfere with tools in another. This is particularly useful when you have a large number of tools or when different sets of tools are used for distinct purposes.
Wanaku provides a fixed set of 10 available slots for namespaces, named from ns-0 to ns-9.
Using Namespaces
To associate a tool or resource with a specific namespace, use the --namespace option when adding it:
wanaku tools add -n "meow-facts-3" --description "Retrieve random facts about cats" --uri "https://meowfacts.herokuapp.com?count={count or 1}" --type http --property "count:int,The count of facts to retrieve" --namespace test --required countIn the example above, the meow-facts-3 tool will be associated with the first freely available namespace.
When you provide a namespace name like test, Wanaku automatically associates it with an available numerical slot from ns-0 to ns-9.
Checking Namespace Assignments
You can verify which namespace a tool or resource has been assigned to by using the wanaku namespaces list command.
This command will display a list of all active namespaces, their unique IDs, and their corresponding paths.
The output will look similar to this:
id                                   name path
381d4276-c824-4bbe-9094-a962c6e8fc46 test http://localhost:8080/ns-9/mcp/sse
4b7a5ec7-c1f3-4311-8067-10148daf3a10      http://localhost:8080/ns-3/mcp/sse
dcf97b5e-8ff7-4d04-944c-194379f2e0e4      http://localhost:8080/ns-2/mcp/sse
dd6f75ac-7b32-4f3b-b965-99040f4af6c2      http://localhost:8080/ns-8/mcp/sse
59e92c00-04d5-4673-a631-d9244c3e07c1      http://localhost:8080/ns-0/mcp/sse
e3ff6cd0-e73d-431f-96c9-327b3a498265      http://localhost:8080/ns-1/mcp/sse
ffe8d322-6ebe-46f2-b913-ac792571fadc      http://localhost:8080/ns-7/mcp/sse
82434059-45b4-442c-b945-385ae36f158d      http://localhost:8080/ns-6/mcp/sse
901ea4d6-8e08-4e8b-8171-ce23ae1380d4      http://localhost:8080/ns-5/mcp/sse
4b2403ca-1acd-419f-9e83-102bbf631536      http://localhost:8080/ns-4/mcp/sse
<default>                                 http://localhost:8080//mcp/sse
In this output, you can see the mapping of internal namespace IDs to their corresponding ns-X paths.
The Default Namespace
If you do not specify a namespace when adding a tool or resource, it will automatically be added to the default namespace.
The default namespace acts as a general container for tools that don't require specific isolation.
You can identify the default namespace in the wanaku namespaces list output by its <default> name.
Understanding URIs
Universal Resource Identifiers (URI) are central to Wanaku.
They are used to define the location of resources, the tool invocation request that Wanaku will receive from the Agent/LLM and the location of configuration and secret properties.
Understanding URIs is critical to leverage Wanaku and create flexible definitions of tools and resources.
Flexible Input Data
Some services may require a more flexible definition of input data.
For instance, consider HTTP endpoints with dynamic parameters:
http://my-host/api/{someId}http://my-host/api/{someId}/createhttp://my-host/api/{someId}/link/to/{anotherId}
In cases where the service cannot predetermine the actual tool addresses, users must define them when creating the tool.
Creating URIs
Building the URIs is not always as simple as defining their address. Sometimes, optional parameters need to be filtered out or query parameters need to be built. To help with that, Wanaku comes with a couple of expressions to build them.
To access the values, ou can use the expression {parameter.value('name')}. For instance, to get the value of the parameter id you would use the expression {parameter.value('id')}. You can also provide default values if none are provided, such as http://my-host/{parameter.valueOrElse('id', 1)}/data (this would provide the value 1 if the parameter id is not set).
It is also possible to build the query part of URIs with the query method. For instance, to create a URI such as http://my-host/data?id=456 you could use http://my-host/data{parameter.query('id')}. If the id parameter is not provided, this would generate a URI such as http://my-host/data. This can take multiple parameters, so it is possible to pass extra variables such as {parameter.query('id', 'name', 'location', ...)}.
IMPORTANT
Do not provide the ? character. It is added automatically the parsing code if necessary.
Building the query part of URIs can be quite complex if there are too many. To avoid that, you can use {parameter.query} to build a query composed of all query parameters.
The values for the queries will be automatically encoded, so a URI defined as http://my-host/{parameter.query('id', 'name')} would generate http://my-host/?id=456&name=My+Name+With+Spaces if provided with a name value of "My Name With Spaces".
Dealing with Request Bodies
The wanaku_body property is a special argument used to indicate that the associated property or argument should be included in the body of the data exchange, rather than as a parameter.
For instance, in an HTTP call, wanaku_body specifies that the property should be part of the HTTP body, not the HTTP URI.
The handling of such parameters may vary depending on the service being used.
Currently special arguments:
wanaku_body
Extending Wanaku: Adding Your Own Capabilities
Wanaku leverages Quarkus and Apache Camel to provide connectivity to a vast range of services and platforms.
Although we aim to provide many of them out-of-the box, not all of them will fit all the use cases.
That's why we make it simple for users to create custom services that solve their particular need.
Adding a New Resource Provider Capability
Creating a New Resource Provider
To create a custom resource provider, you can run:
wanaku capabilities create resource --name y4To run the newly created service enter the directory that was created (i.e.,; cd wanaku-provider-y4), then build the project using Maven (mvn clean package).
NOTE
Capabilities services are created, by default, using Apache Camel. However, it is possible to create purely Quarkus-based capabilities using the option --type=quarkus.
Then, launch it using:
java -Dwanaku.service.registration.uri=http://localhost:8080 -Dquarkus.grpc.server.port=9901 -jar target/quarkus-app/quarkus-run.jarYou can check if the service was registered correctly using wanaku targets resources list.
IMPORTANT
Remember to set the parameters in the application.properties file.
Adjusting Your Resource Capability
After created, then most of the work is to adjust the auto-generated Delegate class to provide the Camel-based URI and, if necessary, coerce (convert) the response from its specific type to String.
Adding a New Tool Invoker Capability
Creating a New Tool Service
To create a custom tool service, you can run:
wanaku capabilities create tool --name jmsNOTE
Capabilities services are created, by default, using Apache Camel. However, it is possible to create purely Quarkus-based capabilities using the option --type=quarkus.
To run the newly created service enter the directory that was created (i.e.,; cd wanaku-tool-service-jms), then build the project using Maven (mvn clean package).
Then, launch it using:
java -Dwanaku.service.registration.uri=http://localhost:8080 -Dquarkus.grpc.server.port=9900 -jar target/quarkus-app/quarkus-run.jarYou can check if the service was registered correctly using wanaku targets tools list.
IMPORTANT
Remember to set the parameters in the application.properties file.
To customize your service, adjust the delegate and client classes.
Adjusting Your Tool Invoker Capability
After created, then most of the work is to adjust the auto-generated Delegate and Client classes to invoke the service and provide the returned response.
In those cases, then you also need to write a class that leverages Apache Camel's ProducerTemplate and (or, sometimes, both) ConsumerTemplate to interact with the system you are implementing connectivity too.
Implementing Services in Other Languages
The communication between Wanaku MCP Router and its downstream services is capable of talking to any type of service using gRPC. Therefore, it's possible to implement services in any language that supports it.
For those cases, leverage the .proto files in the core-exchange module for creating your own service.
CAUTION
At this time, Wanaku is being intensively developed, therefore, we cannot guarantee backwards compatibility of the protocol.
NOTE
For plain Java, you can still generate the project using the archetype, but in this case, you must implement your own delegate from scratch and adjust the dependencies.
Adjusting the announcement address
You can adjust the address used to announce to the MCP Router using either (depending on whether using a tool or a resource provider):
wanaku.service.registration.announce-address=my-host
This is particularly helpful when running a capability service in the cloud, behind a proxy or firewall.
Supported/Tested Clients
Wanaku implements the MCP protocol and, by definition, should support any client that is compliant to the protocol.
The details below describe how Wanaku MCP router can be used with some prominent MCP clients:
Embedded LLMChat for testing
Wanaku Console includes simple LLMChat specificly designed for quick testing of the tools.
NOTE
At the moment, the Embedded LLMChat supports only the tools.
open http://localhost:8080- Setup LLM -
baseurl,api key,model, and extra parameters - Select tools
- Enter prompt and send
Claude
To integrate Wanaku with Claude Desktop, you will need to add an entry into the claude_desktop_config.json file - see instructions for creating a Claude desktop configuration if you do not already have one.
Claude Desktop does not currently support connecting to SSE-based endpoints, so you will have to configure wanaku using a stdio-to-sse wrapper. Note that you will have to install for this purpose, and specify the SSE URL for your Wanaku instance in the arguments.
{
  "mcpServers": {
    "wanaku": {
        "command": "uvx",
        "args": [
            "mcp-proxy",
            "http://localhost:8080/mcp/sse/"
        ]
      }
  }
}
HyperChat
Wanaku works with HyperChat. To do so, you can configure Wanaku as an MCP server using the MCP configuration as shown below:

IMPORTANT
Make sure to have Wanaku up and running before configuring HyperChat. You may also need to close and reopen HyperChat.
After configuring HyperChat, you may need to go the Main Window and edit any existing agent if you have any. Then, in the agent configuration Window, in the allowMCPs option, make sure you mark Wanaku as an allowed MCP server. If in doubt, check the HyperChat project documentation.
NOTE
Older versions of HyperChat (pre 1.1.13) required manually editing the mcp.json file as described on the improvement ticket. This is not necessary for newer versions.
LibreChat
For LibreChat search for mcpServers on the librechat.yml file and include something similar to this:
mcpServers:
    everything:
        url: http://host.docker.internal:8080/mcp/sse
IMPORTANT
Make sure to point to the correct address of your Wanaku MCP instance.
In LibreChat, you can access Wanaku MCP tools using Agents.
Witsy
We also have tested Wanaku with Witsy - AI Desktop Assistant.
Using an STDIO gateway
Wanaku does not support stdio. Therefore, to use Wanaku with to use it with tools that don't support SSE, it is necessary to use an stdio-to-SSE gateway. The application super gateway can be used for this.
npx -y supergateway --sse http://localhost:8080/mcp/sseAvailable Resources Capabilities
Visit this page to check all the providers that come built-in with Wanaku.
Available Tools Capabilities
Visit this page to check all the tools that come built-in with Wanaku.
API Note
All CLI commands use the Wanaku management API under the hood. If you need more advanced functionality or want to automate tasks, you may be able to use this API directly.
By using these CLI commands, you can manage resources and tools for your Wanaku MCP Router instance.